Let's build a Blender Pixabay Addon – Part 2
- Adding search bar and options
- Creating a flow to enter and save the API key
- Making requests using the search options
- Closing Thoughts

In the last part, we took care of the boring stuff. We setup a basic scaffolding for the addon, a build-update-reload process, and acquired and tested our Pixabay API key. In this part we will start working on the actual features of the addon. The goal today is to:
- Start creating the UI for the addon
- Create a config/working directory for the addon
- Create a flow to ask, save and load API key from the disk
- Make API requests when search parameters are changed in the UI
We have got a lot of ground to cover, so let’s go!
Adding search bar and options
First let’s start by adding a search bar and the various search options. If you look at the Pixabay API documentation, you can see that the Image Search API has a lot of parameters. To keep things simple, we will only implement a subset of these parameters, namely:
-
q– the search term -
image_type– type of the image: “all”, “photo”, “illustration”, “vector” -
orientation– orientation of the image: “all”, “horizontal”, “vertical” -
order– order in which to sort the search results: “popular”, “latest” -
page– page number of the returned search results
In Blender, all UI elements represent some property or operator. We do have things like labels, menus, etc. which don’t represent either of these directly, but most of what you see in the UI is either a property or an operator – they either let you change something or run something.
So, in order to display our search parameters, we have to first create the corresponding properties. Since the parameters are related, it makes sense to group them together using a PropertyGroup, rather than declaring separate properties.
Creating a PropertyGroup for search options
Let’s create a new file named props.py inside the src directory and add the following code to it:
import bpy


class PixabaySearchProps(bpy.types.PropertyGroup):
    q: bpy.props.StringProperty(
        name="Search Term",
        maxlen=100,
    )

    image_type: bpy.props.EnumProperty(
        name="Image Type",
        items=[
            ('all', "All", ""),
            ('photo', "Photo", ""),
            ('illustration', "Illustration", ""),
            ('vector', "Vector", ""),
        ],
    )

    orientation: bpy.props.EnumProperty(
        name="Orientation",
        items=[
            ('all', "All", ""),
            ('horizontal', "Horizontal", ""),
            ('vertical', "Vertical", ""),
        ],
    )

    order: bpy.props.EnumProperty(
        name="Order",
        items=[
            ('popular', "Popular", ""),
            ('latest', "Latest", ""),
        ],
    )

    page: bpy.props.IntProperty(
        name="Page",
        default=1,
        min=1,
    )


def register():
    bpy.utils.register_class(PixabaySearchProps)


def unregister():
    bpy.utils.unregister_class(PixabaySearchProps)
We create property groups by writing a class that inherits from bpy.types.PropertyGroup and adding properties to it. A few things worth noting here:
-
The
nameparameter in each property controls the label that will be displayed next to it when added to the UI. -
We use
EnumPropertyto define parameters that only take certain predefined values. Each entry in theitemslist a tuple of three strings, where the first value corresponds to the ones listed in the documentation, the second value controls the name of that value in the UI and the third is a description of the item which we have left empty. -
We have defined
registerandunregistermethods to handle the registration and deregistration of our property group. Instead of cluttering the main__init__.pyfile, we can define these methods in corresponding modules like this and simply call them in the main__init__.pyfile, which is exactly what we are going to do next.
Adding search options to the panel
With our property group in place, let’s import it into our main __init__.py file and handle the registration. Open the __init__.py file and make the following changes:
import bpy
from . import props #1


class PIXABAY_PT_view3d_panel(bpy.types.Panel):
    ...


def register():
    from bpy.types import WindowManager
    from bpy.props import PointerProperty

    props.register() #2
    WindowManager.pixabay_search_props = PointerProperty( #3
        type=props.PixabaySearchProps
    )

    bpy.utils.register_class(PIXABAY_PT_view3d_panel)


def unregister():
    from bpy.types import WindowManager

    bpy.utils.unregister_class(PIXABAY_PT_view3d_panel)

    del WindowManager.pixabay_search_props #3
    props.unregister() #2

...
-
We import the
propmodule. -
We add
props.register()andprops.unregiser()calls toregister()andunregister()functions respectively. -
Most importantly, adding our property group to the
WindowManagertype using aPointerProperty. Since the window manager is accessible anywhere in Blender through thecontext.window_managerattribute, it is a common practice to add addon properties to it.
Also, note that we are calling props.register() before registering the panel, and calling props.unregister() after unregistering the panel since it will depend on the property group once we add those properties to it’s layout.
Now that we have our property group in place, let’s add those properties to our panel. Modify the draw method in PIXABAY_PT_view3d_panel as follows:
...

class PIXABAY_PT_view3d_panel(bpy.types.Panel):
    ...

    def draw(self, context):
        layout = self.layout
        layout.use_property_split = True
        layout.use_property_decorate = False

        wm = context.window_manager

        search_props = wm.pixabay_search_props

        layout.prop(search_props, "q")
        layout.prop(search_props, "image_type")
        layout.prop(search_props, "orientation")
        layout.prop(search_props, "order")
        layout.prop(search_props, "page")

...
In the above draw method, first we get window manager object using context.window_manager and access the search properties through it. Once we have the search properties in search_props, we simply add them to the layout using the layout.prop() method.
Setting the use_property_split attribute to True renders the property labels and the actual values separately. And setting the use_property_decorate to False turns off the Animate Property buttons next to the properties. Feel free to comment out those lines to see the difference.
Now, let’s press that ▶️ button in the Text Editor and have a look at the result:
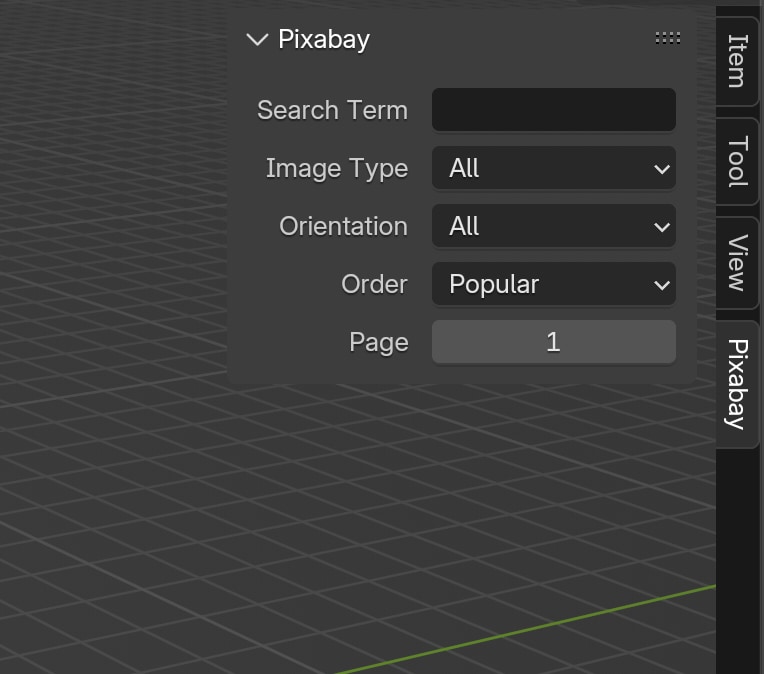
Great! We have our search properties in place. But at the moment, they don’t do anything other than simply store a value. Let’s see how to use these properties to make requests to the API.
Creating a flow to enter and save the API key
Before we look at making API requests, let’s think about how the addon would ask the user for the API key when using the addon for the first time and how to go about saving it to the disk.
Have a look at this flow:
- When Blender starts, check if the API key is already on the disk.
- If API key exists on the disk then load it into the memory.
- If the key doesn’t exist, display a message and a button to set the API key on our panel.
- Once the user clicks on the button, and enters the API key, make a test request to the Pixabay API to confirm if the key is valid.
- If the key is valid, hide the message and the button, and save the API key to the disk.
- If the key is not valid, display an error message asking the user to try again.
I hope this a reasonably simple and clear flow for the user.
Now, before we tackle steps 1 and 2, let’s figure out how to go about steps 3-6 assuming the API key doesn’t exist on the disk. Also, let’s not worry about saving the key to the disk for now.
Writing an operator to set the API key
While we can display a message on our panel simply by using the layout.label() method, in order to display a button, we need to write the corresponding operator first. So let’s do that.
Create a new file named operators.py inside the src directory and add to following code to it:
import bpy
import os
import requests


class PIXABAY_OT_api_key_set(bpy.types.Operator):
    bl_idname = "wm.pixabay_api_key_set"
    bl_label = "Set Pixabay API Key"

    api_key: bpy.props.StringProperty( #1
        name="Pixabay API Key",
        options={'SKIP_SAVE'},
        subtype='PASSWORD'
    )

    def invoke(self, context, event): #2
        wm = context.window_manager
        return wm.invoke_props_dialog(self)

    def execute(self, context):
        wm = context.window_manager

        params = {"key": self.api_key}
        r = requests.get(wm.pixabay_base_url, params=params) #3

        if not r.status_code == 200: #4
            self.report({'ERROR'}, "Invalid API key! Try again.")
            return {'CANCELLED'}

        os.environ['PIXABAY_API_KEY'] = self.api_key #5

        for region in context.area.regions:
            region.tag_redraw()

        self.report({'INFO'}, "API key is set.")

        return {'FINISHED'}


def register():
    bpy.utils.register_class(PIXABAY_OT_api_key_set)


def unregister():
    bpy.utils.unregister_class(PIXABAY_OT_api_key_set)
Before I explain what is going on in the operator, note that we are following a similar pattern to the props module here. First, we write our classes, then define functions to handle registration/deregistration in the module itself.
A few things worth noting about the operator:
-
Here we define a
StringPropertynamedapi_keythat will be used to temporarily store the API key when the operator is executed. Note that we have set thesubtypeto'PASSWORD'so that when the user enters the key, the text field would display asterisks****instead of the actual key. We have also set theoptionsto{'SKIP_SAVE'}so that the operator does not retain the key in this property if executed again. -
The
invoke()method is here only to display a dialog box to enter the API key before the operator is executed, i.e., before theexecute()method runs. -
Here, we are making a test request to the Pixabay API. Note that the params is simply a
dictcontaining the API key entered by the user. Also note that an attribute calledwm.pixabay_base_urlhas suddenly appeared out of nowhere. Don’t worry. We will create this in our main__init__.pyfile. :) -
We determine if the request was successful by checking whether the
status_codeis200. If it is not, we report that the key is invalid and cancel the execution. -
If the result was successful, we store the API key as an environment variable using
os.environ['PIXABAY_API_KEY']and report that the API key is set.
I will explain why we are using an environment variable to store the API key in a moment. Also, the redraw code that you see at the end of the operator is there to update the interface immediately after the API key is set. Otherwise, you will have to move the mouse cursor to the panel for it to update.
Okay, now that we have the operator, let’s add it to our panel. Make the following changes to the panel class in our main __init__.py file:
import bpy
import os #1
from . import operators #1
from . import props


class PIXABAY_PT_view3d_panel(bpy.types.Panel):
    ...

    def draw(self, context):
        ...

        api_key = os.environ.get('PIXABAY_API_KEY') #2

        if api_key is None: #3
            layout.label(text="API key is not set.", icon='WARNING_LARGE')
            layout.operator("wm.pixabay_api_key_set", text="Enter API key")

        search_props = wm.pixabay_search_props

        col = layout.column() #4

        col.prop(search_props, "q")
        col.prop(search_props, "image_type")
        col.prop(search_props, "orientation")
        col.prop(search_props, "order")
        col.prop(search_props, "page")

        col.enabled = api_key is not None #5


def register():
    ...

    props.register()
    WindowManager.pixabay_search_props = PointerProperty(
        type=props.PixabaySearchProps
    )

    WindowManager.pixabay_base_url = "https://pixabay.com/api/" #6

    operators.register() #7
    bpy.utils.register_class(PIXABAY_PT_view3d_panel)


def unregister():
    ...

    bpy.utils.unregister_class(PIXABAY_PT_view3d_panel)
    operators.unregister() #7

    del WindowManager.pixabay_base_url
    ...


if __name__ == "__main__":
    register()
-
We import the
osmodule and our newly createdoperatorsmodule. -
We get the API key using
os.environ.get()method and store it in theapi_keyvariable. At the moment this would simply returnNonesince the API is not set. -
We check if the
api_keyisNoneand conditionally render our message and button. In this case it will beNone. -
We create a new column sub-layout
coland change all ourlayout.prop()methods tocol.prop(). This way we can control if our search options are enabled use theenabledattribute of thecolsub-layout (see next item below for details). -
Similar to what we did with our message and button, we set the
enabledproperty of thecolsub-layout by evaluating theapi_key. In this case, the column will only be enabled if theapi_keyis set (opposite to what we do in 3). -
We store the Pixabay API base URL in the window manager
pixabay_base_urlattribute which, if your recall, we used in our operator. -
The usual house-keeping here: add calls to the corresponding register and unregister functions.
Now, let’s press that ▶️ button in the Text Editor and have a look at the result:
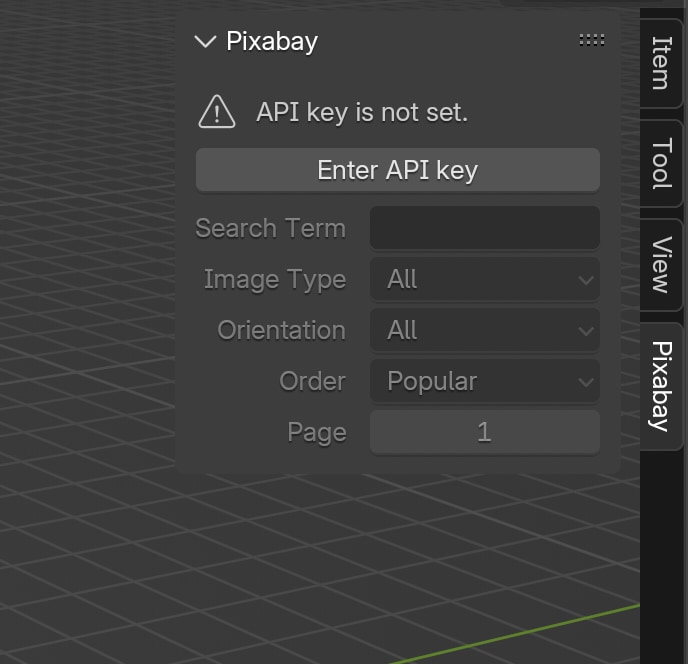
Look at that! The panel displays our message and the button to set the API key. Also notice that the search options are greyed out since the key is not set.
Now try pressing the Enter API key button, paste your API key, confirm and see what happens:
There you go. Pressing the button brings up a dialog box to enter the API key. The subtype took care of rendering the key as asterisks ****. Clicking on OK validated our key and assigned it to the environment variable hiding the message and the button, and enabling the search options. We have most of the flow in place!
The only thing left here is to figure out where and how to save the key to the disk and also take care of loading the key from the disk when Blender is launched.
Creating the addon config directory
When it comes to saving addon specific files to the disk, we have two options. The first – and the official – way to do this is to use the bpy.utils.extension_path_user() method to let Blender create and manage a directory for us. This is documented here in the Blender manual and works well. The only downside of this method is that, even though this directory will be retained when an addon is upgraded, it will be removed when the addon is uninstalled.
Depending on what your addon does, this may not be desirable. So the other way to achieve this is to use the operating system’s application/config directory. The location of this directory for different operating systems is listed below:
- Linux –
~/.config/ - MacOS –
~/Library/Application Support/ - Windows –
~\AppData\Roaming\
We can use the platform module in Python to get the operating system Blender is running on and then use the os or pathlib module to create this directory. Let’s create a new file named common.py in the src directory and add the following code to it:
import platform
from pathlib import Path


def addon_directory_get():
    addon_name = "pixabay_blender"
    addon_dir = None

    if platform.system() == "Linux":
        addon_dir = Path.home().joinpath(f".config/{addon_name}/")
    elif platform.system() == "Darwin":
        addon_dir = Path.home().joinpath(f"Library/Application Support/{addon_name}/")
    else:
        addon_dir = Path.home().joinpath(f"AppData/Roaming/{addon_name}/")

    if not addon_dir.exists():
        addon_dir.mkdir()

    return str(addon_dir)
We check the operating system using the platform.system() method, and construct the addon_dir accordingly. Then we create this directory if it doesn’t exist and return its full path. Note that we haven’t added any register() or unregister() methods here, since this is just a regular Python module.
Now go back to the __init__.py file and make the following changes:
import bpy
import os
from . import operators
from . import props
from .common import addon_directory_get #1


...


def register():
    ...

    WindowManager.pixabay_base_url = "https://pixabay.com/api/"
    WindowManager.pixabay_addon_dir = addon_directory_get() #2

    wm = bpy.context.window_manager
    key_file = os.path.join(wm.pixabay_addon_dir, "api_key")

    try:
        with open(key_file, "r") as f:
            os.environ['PIXABAY_API_KEY'] = f.read() #3

    except Exception as e:
        print(str(e))
        print("API key not set.")

    ...


def unregister():
    ...

    del WindowManager.pixabay_addon_dir
    del WindowManager.pixabay_base_url
    ...


if __name__ == "__main__":
    register()
-
We import the
addon_directory_get()function from ourcommonmodule. -
We add another attribute to the window manager called
pixabay_addon_dirand assign the directory returned by theaddon_directory_get()function. We store this in the window manager since we will be accessing this directory frequently for more than just storing/retrieving the API key. We will look at those use cases in the upcoming parts. -
We try reading the key file and assigning the API key to the environment variable. In case something goes wrong, we simply capture and print out the exception.
There is still one more step required to make this flow work from end-to-end. Open the operators.py file and add these lines (marked with #) to the execute() method:
...

        ...

        os.environ['PIXABAY_API_KEY'] = self.api_key
        key_file = os.path.join(wm.pixabay_addon_dir, "api_key") #

        with open(key_file, "w") as f: #
            f.write(self.api_key) #

        for region in context.area.regions:
            region.tag_redraw()

        ...

...
Now, restart Blender (to clear the API key from the environment variables), reopen the testing.blend file, press the ▶️ button in the Text Editor and go through the flow again. Once you set the API key, close and restart Blender again.
You will notice that the addon no longer asks for the API key. Which means our operator has successfully saved the API key to the addon config directory and the register() function in the __init__.py file loaded it from the disk on startup. Cool!
Let’s do one last thing before we call it a day.
Making requests using the search options
Every time the user enters a search term, or changes any of the search options, we want to make a request to the API using those values as parameters. Blender provides a builtin mechanism to run a function every time a property is updated. This can be achieved by assigning a callback function to the update parameter when creating a property.
Open the props.py file and make the following changes to it:
import bpy
import os #1
import requests #1


def search_results_get(self, context): #2
    wm = context.window_manager
    search_props = wm.pixabay_search_props #3

    params = { #4
        "key": os.environ.get('PIXABAY_API_KEY'),
        "q": search_props.q,
        "image_type": search_props.image_type,
        "orientation": search_props.orientation,
        "order": search_props.order,
        "page": search_props.page
    }

    r = requests.get(wm.pixabay_base_url, params=params) #5
    resp = r.json() #5

    for hit in resp["hits"]:
        print(hit["previewURL"]) #6


class PixabaySearchProps(bpy.types.PropertyGroup):
    q: bpy.props.StringProperty(
        ...
        update=search_results_get #7
    )

    image_type: bpy.props.EnumProperty(
        ...
        update=search_results_get #7
    )

    orientation: bpy.props.EnumProperty(
        ...
        update=search_results_get #7
    )

    order: bpy.props.EnumProperty(
        ...
        update=search_results_get #7
    )

    page: bpy.props.IntProperty(
        ...
        update=search_results_get #7
    )

...
-
We import the necessary modules for our callback function.
-
We write our callback function –
search_results_get. Callback functions have to takeselfandcontextas input and must not return anything. -
We get the search options from the window manager.
-
We build the
paramsdict by using values from the search options. May not be the most elegant way to do this, but works for now. -
We make a request to the API using the
requestsmodule and access the JSON response using ther.json()method. -
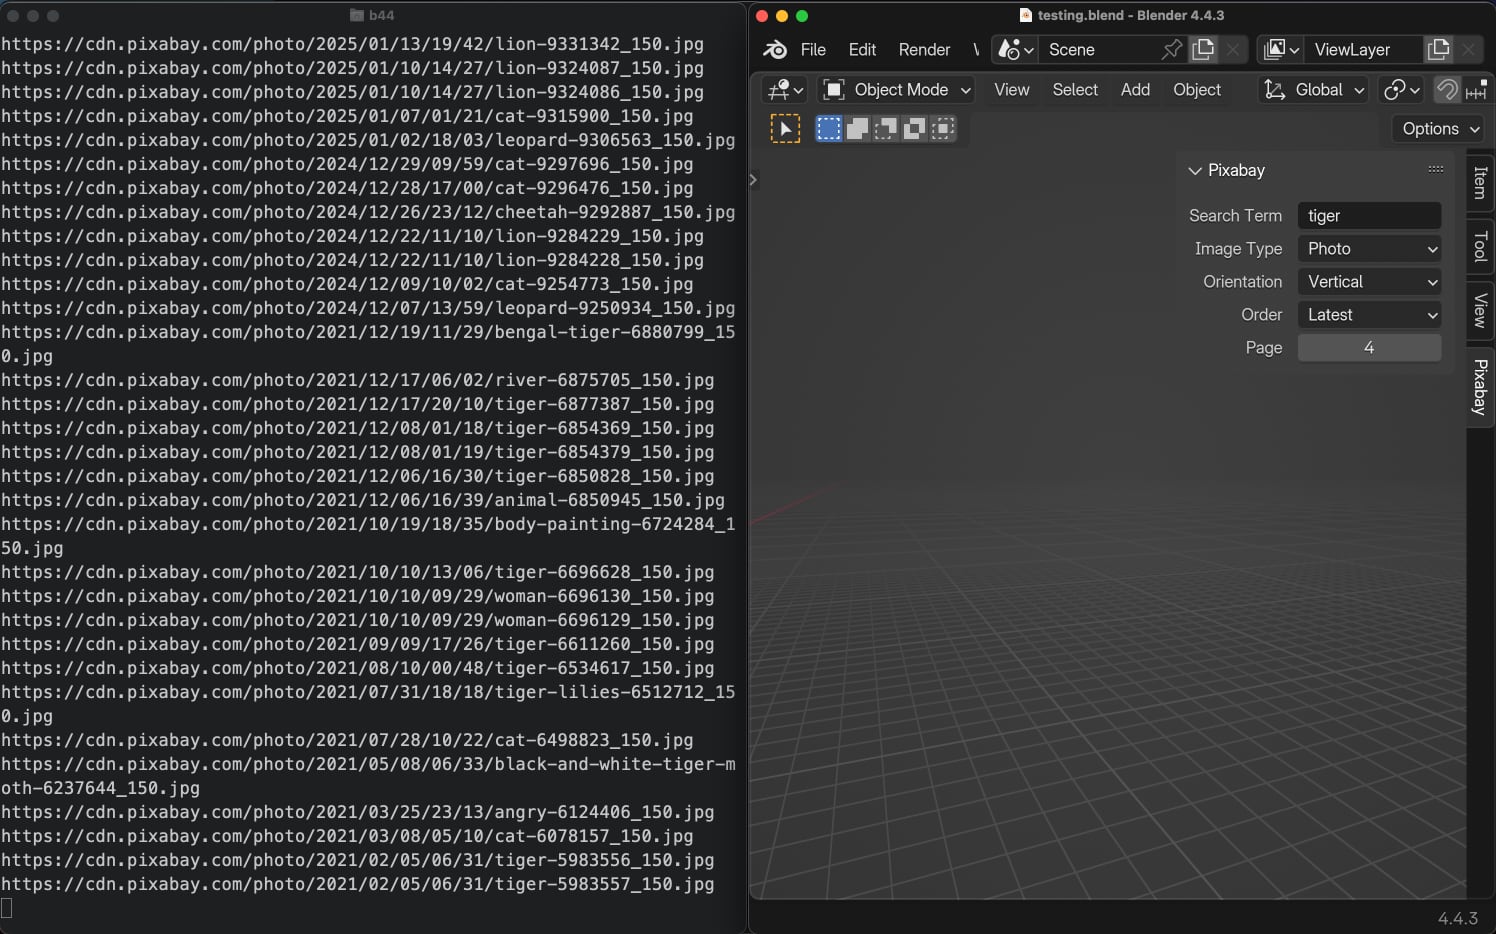
Then we iterate through the hits in the search results and print out the preview URL for each hit. Refer to the response structure in the Pixabay API documentation for details. We will dive into this in the upcoming part(s).
-
Finally, to make the properties use our callback function, we assign it to the
updateparameter of each property in our property group.
Now, press that ▶️ button one last time, keep the Blender window and the console open side by side and try changing the search options. You should see the preview URLs printed out in the console as you make each change in Blender:
If you did everything correctly so far, your directory layout should look something like this:
blender_pixabay/
    testing.blend
    build.py
    blender_pixabay.zip

    src/
        blender_manifest.toml
        __init__.py
        common.py
        operators.py
        props.py
Closing Thoughts
That’s it for today. I thought, in this part, we could get to a point where we download the search result previews and display them inside Blender. But that would make this a very loong blog post. So we will stop here for today and continue in the next part. In fact, I have already built the addon to a point where it downloads and displays search results inside Blender UI:

In the next part we will be looking at:
- Downloading preview images to the addon directory
- Creating a caching mechanism for API requests and preview images
- Displaying preview images inside the Blender UI
- And more…
I can’t wait to share Part 3 with you. Stay tuned. 🙌🏻
You can get the source code for this part on Gumroad. If you have previously got the source code from Part 1, this should already be in your library.
Subscribe to my newsletter
Join 1500+ Technical Artists, Developers and CG enthusiasts who receive my latest posts on Blender, Python, Scripting and Computer Graphics directly to their inbox.